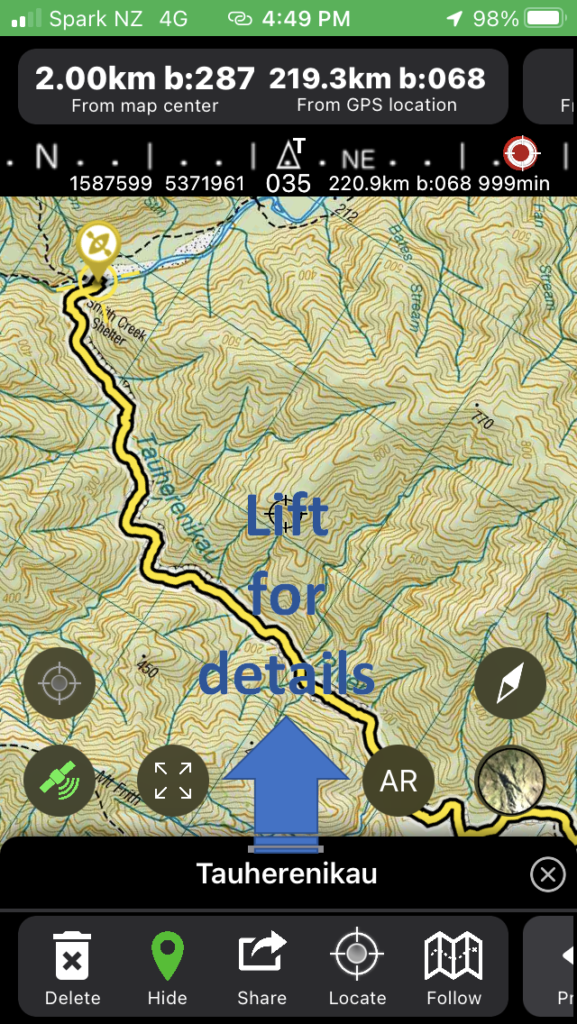
When you select a waypoint or track from the search table or from the map, you will see some navigation details appear at the top of the map, and the name of the track/waypoint and editing buttons will appear at the bottom of the map. Further details can be seen by dragging up the information window. Alternatively if you long press on the waypoint/track then the details information page will open directly. The information and editing information that is displayed will be different depending on what type of object it is (track, waypoint, region), and whether it is a fixed object or one that you have created or recorded.
Track Controls
The track controls are displayed along the bottom of the map. Different menu bars can be accessed by swiping the bar to the left or right. The first menu bar contains controls for deleting, hiding/showing, sharing (exporting), locating, and following the track.
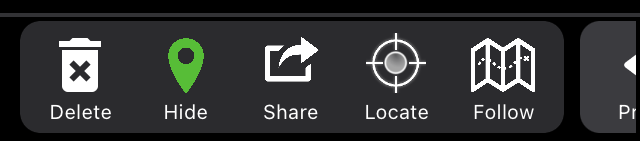
The delete button can be used to delete the selected object. You will be prompted for confirmation, and then it will be permanently deleted.
The hide button is used to set the visibility of the selected object. If it is hidden then it will no longer display on the map screen but is not deleted. It can be accessed from the search table and made visible again if required. When you hide a selected track it will remain faintly visible until it is de-selected, or made visible again.
The share button is used to create a file in a common format that can be used by yourself in other apps, or shared with other people for them to use. Formatting in KML or GPX format is possible. The format to use can be selected from the Settings page. When you tap the share button you will be given options for what to do with the file created. This is dependent on your phone setup, but may include a number of options such as saving it as a file, emailing it to someone, opening it with other apps that are able to import these types of files, or other options.
The locate button will shift the map position so that the selected object is on the screen.
The follow button is used to turn follow mode on or off. When it is on, the top navigation information bar will display information related to how far along the route you have travelled, and the currently selected data point along the route will automatically increment to the next one when you approach it. Note that tracks are directional – if you want to follow a track in a reverse direction then the track can be inverted (see below). Turning on track following will activate GPS measurement if this is currently off.
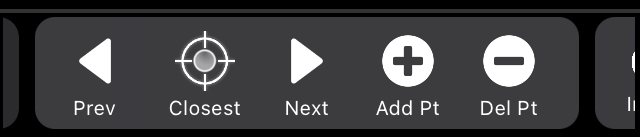
The second menu bar displays options for adding or editing points along a track. If the selected object is a waypoint then it becomes a route if you add data points to it. If the object is a recorded track with time data associated with each data point, then new data points can be added but may produce artefacts in calculated track times and velocities.
The currently selected data point is highlighted on the map with a diagonal cross hair display. The selected point can be adjusted with the Previous and Next buttons. If track following is turned on then changing the selected point will change the current target point for following. Note that the selected point may also automatically change if you approach the point.
The Closest button can be used to jump to the nearest data point on the track. If follow mode is off then it will select the closest position to the current focus point on the map. If follow mode is on then it will jump to the nearest point to your current GPS position in the direction of travel of the track (ie if you are close to one point but have passed it in the direction of the next point then the next point will be selected)
The Add button will add a datapoint after the currently selected point, using the focus point of the map for the grid coordinates. The Delete button will remove the currently selected point.
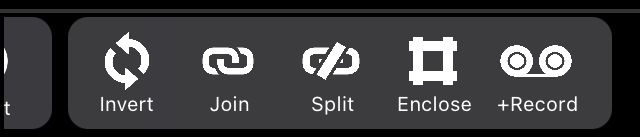
The third menu bar gives further options for modifying routes or tracks.
Invert is used to change the direction of a track. Tapping alternates between forward and reverse directions.
the join button can be used to join two tracks. Select the first track, tap join to set it as the initial track, then select the second track and press join again. A new track is created from the two joined tracks. The original tracks are retained unmodified. Routes (tracks without timepoints) or regions boundaries can be joined interchangeably with recorded tracks but the result will have unspecified time data associated with some of the datapoints.
Split is used to split a track or route into two tracks. The split is made at the currently selected datapoint and should be preselected using the Previous and Next buttons.
Enclose sets a track or route to be displayed as a filled region. Tap it again to display it as a line only.
+Record can be used to continue recording onto the end of an existing track. There may be discontinuities in the recording if your current location is different to the end point of the selected track.
Navigation Information
The top of the map shows navigational information related to the selected track.

The navigational information bar displays the distance and bearing between the current map center point and the selected track. If GPS is turned on then the distance and bearing to your current location is also displayed. If the selected object is a waypoint then the distance and bearing is to the location of the object. Otherwise, the distance and bearing is to the location of the currently selected datapoint along the track/route.

The second navigation information panel shows information related to points along a route or track. The distance along the track from the start point to the selected point is displayed, along with the remaining distance to the end of the track. If track following is enabled then the distance to the currently selected datapoint is also displayed.
Track Details
Further track details are shown in the detailed track view.

Track name and description are displayed first. Both can be edited unless it is a fixed built-in object.
Below the name and description the creation data and icon are shown. The icon can be changed by scrolling through the available icons. Tapping the icon changes the colour. Long press on the icon will change back to the previous colour.
Below the icon an optional image or photo can be added to the track details.
The next block shows details associated with a recorded track – elapsed time, estimated moving time, average speed, elevation gain and descent, and elevation range. This block is only shown when a track has timestamp data associated with the datapoints, for example a recorded GPS track. Routes that are created by plotting points on a map, and some imported tracks, do not have this information. Climb and descent calculations shown here are based on recorded or embedded elevation data, which may also not be present for some tracks.
The next block shows calculated geometric data, including the length of the track, enclosed area defined by the track boundary (only accurate for simple boundaries that do not overlap of have disconnected sections), and the elevation gain and descent calculated from the known land elevation.
The next block shows the grid reference in different coordinate systems for the starting point for the track.
The next block shows calculated Naismith walking times for a route or track. This is an established estimation method that takes into account the elevation climb and descent as well as the length of the track. Typically it calculates a low time representative of ideal walking conditions that are rarely met on typical New Zealand tracks. The selectors can be used to adjust the calculation, but are subjective only and not related to the original Naismith calculation.
The final block shows a plot of the elevation or speed against time or distance. Change the axis with the selectors. When elevation data is present in the tracks data (for example from a GPS recording) then this is displayed in red. Calculated elevation based on the known ground elevation is plotted in green.