GPS and recording issues
Your GPS location might not be available, or might be slow to obtain, for a number of reasons. These can be related to your phone’s general settings, settings on the NZTopo50 app, or to environmental or hardware factors.
You might also observe track recordings that don’t appear to show your true progress, only recording periodic points that show up as a series of jagged lines, or sometime adding points even when you are standing still.
Check through all the following options to see what might be the issue, and for tips on obtaining good location and track recording.
GPS settings on the NZTopo50 app
To display your GPS location on the map you will need to turn on GPS positioning in the app – simply tap the satellite icon at the bottom left of the screen. GPS positioning will also turn on if you start recording a track.
To see your GPS location you will need to allow the NZTopo50 app to have access to your location. When you first activate GPS positioning you will get a prompt to give this permission. Depending on your operating system you may have several options including to allow the access, allow it only once, or to deny permission.
To check your current permission settings you can either use your phones ‘Settings’ app, or check on the settings page in the NZTopo50 app itself. On the Apple version look under map controls for ‘location status’, or in the Android version under ‘App Permissions’, and also ‘Power Save Modes’.
It is also worth noting that some devices do not actually have a GPS chip in them and cannot measure your GPS location. This may not be immediately obvious as the device can still estimate its location in urban areas using cellular and wifi signals, but you will not be able to determine your location accurately and not at all as soon as you are off-line or outside of cellular range. It is possible to use external plug in GPS devices with most phones/tablets if you really need GPS measurements on a device without its own GPS chip.
Accuracy filter. On the settings page of the NZTopo50 app there is an option for filtering out inaccurate signals in a track recording. This can be useful to avoid poor quality signals being including in the recorded track, but can also result in very few points being recorded if signal accuracy is low and the filter setting is set too low. If you find that your track recordings show jagged lines with most of the track details missing then check that this filter setting is not set too low.
System settings
(1) Master Location Access. It is possible for you to turn off access to your location in a number of ways which will result in the NZTopo50 app (and other apps) not being able to determine your position.
On an iPhone you can do this from the Settings App, under Privacy, Location Services. Toggle the switch to turn on/off location access on your phone. Further down the same page you can also check and adjust the individual access permissions for all of your installed apps. For proper functioning of the NZTopo50 app make sure that Location Services is on, and that the NZTopo50 app settings displays ‘While Using’ (or ‘Always’).
On an Android phone, location access on your phone can be turned on/off from the Quick Settings panel (swipe down from top of screen, depending on Android version) using the ‘Location’ icon, or from the Settings App under Location. For full functionality of the NZTopo50 app, make sure that ‘Location’ is On and that under App Permissions the NZTopo50 app is listed under ‘Allowed all the time’, or ‘Allowed while in use’.
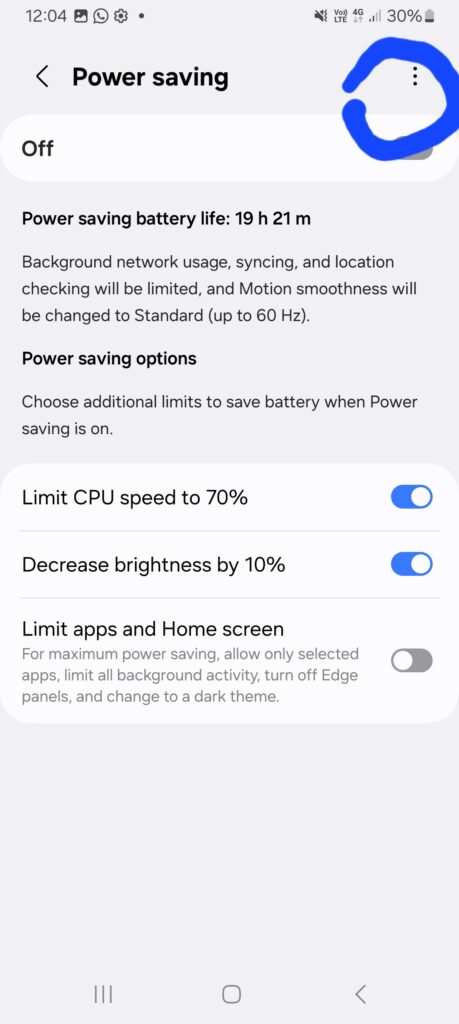
(2) Power Saving Modes (Android). On Android phones, power saving settings can interfere with proper location access. Power saving modes will generally deactivate GPS positioning, so should be switched off if/when you want full functionality of the NZTopo50 app. This is a common cause of the ‘jagged line’ track recording where only a few datapoints are obtained, or sometimes none at all.
Anything that includes options like ‘Power Saving Mode’, ‘Battery Management’, or third party power saving apps should be disabled.
Power Saving settings vary with Android version and Phone model, but some examples are given below. For other versions or phones you should be able to find instructions by searching for your phone model and ‘disable power saving’.
In the Settings page of the NZTopo50 App, check under both App Permissions and Power Save Modes to see if there are any limitations detected. Note that this will not detect all phone model specific issues. Click the ‘Change’ button to be taken to relevant areas of your phone’s Settings. This does not cover all settings, there may be other phone settings that affect location availability.
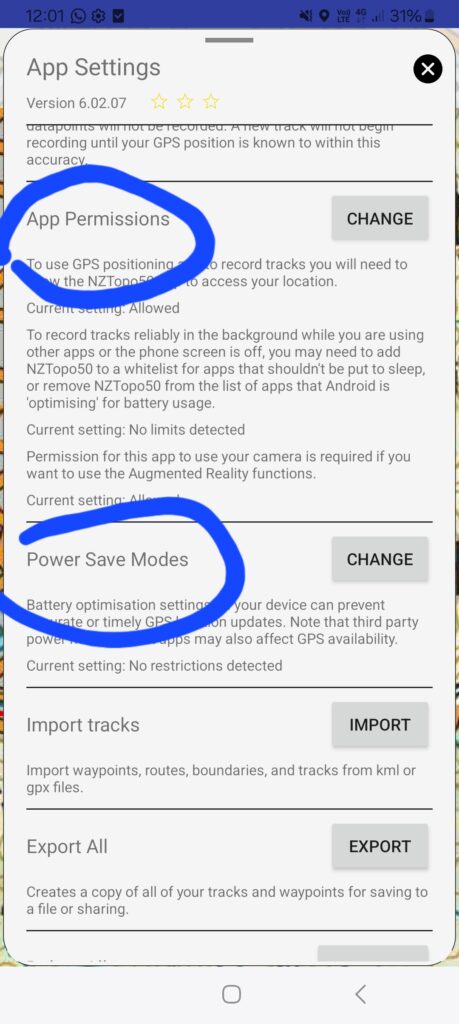
Under App Permissions, click Change and then under Permissions and Location, make sure that location access is ‘Allow while using the app’, or ‘ask every time’, and make sure ‘Use Precise Location’ is turned on.
Under Power Save Modes make sure that Power saving is turned off, and under the three dots select ‘Adaptive Power Saving’ and make sure this is off.
When you first ask for location access in the NZTopo50 app, you may see a prompt to allow the NZTopo50 app to be whitelisted to ‘ignore battery optimisation’. This is important. If you deny this permission then on some phones you can find this setting in your Settings app under ‘Apps’, ‘NZTopo50X’, ‘Battery’, and choose ‘Unrestricted’. On other phones you may not be able to change it.
The following notes are AI generated. Run a Google search on your phone model to get alternative details for how to turn off all of the location and battery related restrictions that your phone manufacturer has added.
Device specific settings
Samsung (One UI)
Samsung has multiple overlapping restriction systems, which makes it one of the more complex to configure correctly.
1. Per-app Battery setting Go to Settings → Apps → [Your App] → Battery and set it to “Unrestricted”. This is the most direct control — it tells Samsung’s system not to restrict the app at all.
2. Background Usage Limits (Sleeping / Deep Sleeping apps) Apps that haven’t been used for about 3 days and are consuming battery in the background will be moved into “sleeping” mode, where features like alarms, background jobs, and foreground services are restricted. Android Central Go to Settings → Battery & Device Care → Battery → Background Usage Limits and add your app to the “Never sleeping apps” list.
3. Adaptive Battery After 3 days, any app not actively used may be unable to start from the background. Don’t kill my app! Turn off Adaptive Battery under Settings → Battery & Device Care → Battery → More battery settings → Adaptive battery.
4. Power Saving Mode When Power Saving mode is on, background apps are restricted from Wi-Fi and mobile data, and location services may also be limited. One-sec Keep it off while tracking.
5. Lock the app in Recents Open the Recent Apps view, tap and hold your app’s card, and select “Keep open” or tap the lock icon. This gives extra protection from the system clearing it.
⚠️ Important: Even when you remove an app from the restricted list, Samsung may re-add it after a firmware update or if it thinks the app is using too much resources. Don’t kill my app! It’s worth rechecking these settings after any system update.
One UI 6+ note: Since One UI 6.0, Samsung has officially promised that foreground services of apps targeting Android 14 will be guaranteed to work as intended, so long as they follow Android’s foreground service API policy. Don’t kill my app! If your phone is up to date, things should be more reliable — but the settings above are still worth checking.
OnePlus / OxygenOS Background Restrictions
1. Deep Optimization (main offender) This is the primary app killer on OnePlus 6 and later. Go to Settings → Battery → Battery Optimization → ⋮ (three dots) → Advanced Optimization and turn off Deep Optimization. Don’t kill my app!
2. Sleep Standby Optimization OnePlus tries to learn when you’re usually asleep, and during those times disables the phone’s network connections — which will cut off background location updates. Inthesk Turn this off in the same Advanced Optimization menu as above.
3. Standard Battery Optimization Go to Settings → Battery → Battery Optimization, switch the dropdown to “All apps”, find your app, and select Don’t Optimize. TechMesto
4. App Battery Management (newer OxygenOS) Go to Settings → Battery → App battery management and turn on both “Allow foreground activity” and “Allow all background activity” for your app. Fynch
5. App Auto-Launch On some OnePlus phones, App Auto-Launch is disabled by default, which prevents apps from starting in the background. Don’t kill my app! Look for Settings → Apps → ⚙️ gear icon → App Auto-Launch and enable it for your tracking app.
6. Lock the app in Recents OnePlus can kill background services that have been actively running for longer than a few seconds. Metactrl To prevent this, open the Recent Apps list, tap and hold your app, and choose “Lock” — a lock icon will appear on the app preview. Fynch
7. Watch out after firmware updates Some of these settings get reset with firmware updates, so you may need to re-enable them after a system update.
Xiaomi (MIUI / HyperOS)
Xiaomi’s MIUI has traditionally been among the most problematic for background processes, with non-standard restrictions that have no APIs or documentation — in default settings, background processing simply does not work correctly. Don’t kill my app!
1. Autostart This is the single most important setting on Xiaomi. Go to Settings → Apps → Manage Apps → [Your App] → Permissions and look for “Autostart” or “Background autostart” (the name varies by version) and enable it. XDA Forums Without this, the app cannot restart itself in the background after being killed.
2. Battery Saver — No Restrictions Go to Settings → Installed Apps → [Your App] → Battery Saver and set it to “No restrictions”. radishzz’s blog This prevents MIUI from suspending the app when no movement is detected.
3. Security app — Boost Speed / Block Apps Open the Security app, go to Boost Speed → gear icon (advanced settings) → Block Apps, and enable the toggle for your tracking app XDA Forums so the system never forcibly closes it.
4. Lock the app in Recents In the Recent Apps tray, drag your app’s card downward to lock it. Locked apps are protected and won’t be cleared even if you clear all recent apps. Don’t kill my app! On some devices, long-press the card and tap the padlock icon instead.
5. MIUI Optimizations (advanced) On MIUI 12+, there is an option to disable MIUI Optimizations hidden in Developer settings. You need to enable Developer Mode first (tap “MIUI version” or “HyperOS version” 7 times in About Phone), then look for “MIUI optimizations” in Developer options and turn it off. Don’t kill my app!
Note on HyperOS: Newer Xiaomi phones run HyperOS instead of MIUI. The same settings apply, though menu names may differ slightly. HyperOS is generally considered slightly less aggressive than older MIUI versions.
Huawei (EMUI / HarmonyOS)
Huawei is widely considered the most restrictive Android manufacturer for background apps, with several overlapping kill mechanisms.
1. App Launch — the most important setting Go to Phone Manager → App Launch, find your app, switch it to “Manage manually”, and turn on all three toggles: Auto-launch, Secondary launch, and Run in background. Don’t kill my app! This is the core control for whether Huawei allows an app to keep running when the screen is off.
2. Battery Optimization Go to Settings → Battery Optimization, tap the dropdown and switch to “All apps”, find your app, and select “Don’t allow” (i.e. don’t allow the system to optimize/restrict it). Xiaomi Europe
3. Power Saving Mode Go to Settings → Battery and disable Power Saving mode while tracking. Also go to Battery → More battery settings and enable “Stay connected when device sleeps” X-GPS to prevent the network connection from dropping when the screen turns off.
4. Lock the app in Recents Open the Recent Apps view, find your app’s card, and lock it. Make sure not to swipe it away — doing so will stop it from running in the background. Don’t kill my app!
5. PowerGenie (EMUI 9+ — harder to fix) On EMUI 9 and later, Huawei introduced a built-in task killer called PowerGenie which kills any app not on its internal whitelist. Users cannot add custom apps to this whitelist. Xiaomi Europe If you’ve followed all the steps above and tracking still cuts out after an hour or so, PowerGenie may be responsible. The only reliable fix is disabling it via ADB, which requires a computer — you can look for the option under Settings → Apps → PowerGenie → Disable as a first attempt without ADB.
Environmental factors
GPS signals are relatively weak signals and can be distorted or blocked by overhead or surrounding objects, or even by adverse weather conditions. This can affect both accuracy and availability. GPS satellites are also non-uniformly distributed in the sky and at different times the combination of available satellites may give an inferior signal (particularly in NZ which is of lower interest for satellite coverage and satellites tend to be concentrated lower on the horizon rather than overhead). For best location accuracy try to avoid heavy overhead cover or objects that block line of sight to the sky and horizon, avoid use of thick or metallic phone covers, and avoid burying your phone deep under other equipment.
Sometimes you may observe that it takes a long time to obtain an initial GPS location (or GPS ‘lock’), particularly when out of cell phone range or with wifi turned off (eg in flight mode). This is normal but can be exacerbated by poor signal conditions or by not having a recent approximate location reading. Once a ‘lock’ is obtained then measurements should be accurate and rapid as long as good signal conditions are maintained. If you wish to record a track and have an accurate start time or position then it is a good idea to switch on GPS in the app in advance to give your device time to obtain a GPS lock.
Trouble Shooting
Try toggling Location access on and off again (see above under System Settings)
Try restarting your phone (power off, on again)
Find an open spot with clear access to the sky and wait 10-15 minutes to see if an accurate GPS location is obtained.
Check other location apps to see if there is a difference in behaviour.